
Some of the reasons for me to cosplay are the attraction to the costume and love for the character. I love styles that are technically challenging and that push me to learn new techniques that I don’t encounter every day. In my cosplay portfolio, a majority of the projects are strong females out of video games. The concept artists may or may not be trained as a fashion designer, so it is up to me to execute all the gorgeous intricate designs and make them come to life. Besides getting the silhouette correct, embellishment and weather are a HUGE part of executing a breathtaking costume.

Embellishments are a huge part of what makes a plain cosplay amazing. Please see below for a detailed look in to the steps in which I created the embellishments for a wedding gown cosplay based on a Game of throne’s character.
- To recap the materials:
- Stiff Bukram for body + support
- Lace trims – Flat black Mesh, braided trims, flat trims, ropes.
- Beads – red glass beads, gold spacer beads, garnet beads, crystals for extra bling
- French wires Misc embroidery floss.

Depending on what your choices are, your cosplay may not be as highly decorated as this, but regardless of what your cosplay looks like, this next part will apply to your costume.
Weathering is a process of adding age and battle proven damage to your costume. Fresh off the sewing machine, everything is new and shiny. However, it is not how the character looks. They had been in battles and they traveled far to come to the world they now reside. To show and capture your character’s history, we will go through a few simple step of how to add depth to their background.
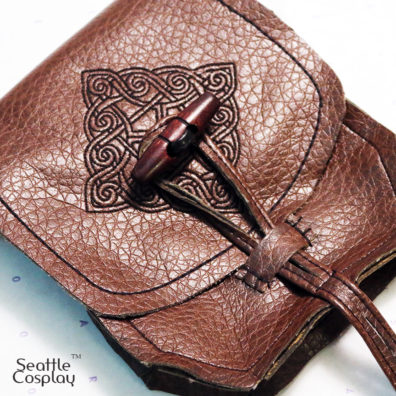
For a light to mid back ground color, we will use black paint to add depth. For a dark color fabric, we will use brown, or tonal darker color to add depth. For our demo, we will weather this leather bag.

After cutting out the pattern pieces, use black acrylic paint to darken the edges. Start with acrylic paint, and lightly dilute with fabric medium. The fabric medium will make the paint more flexible.

After the edges are dried, sew bag together with top stitch thread, according to your pattern. If I didn’t have topstitch thread, I would use a triple stitch to emulate hand stitching effects.
After the bag is assembled, rumble the bag together. (I know, it is painful to rumble such a pristine piece, but it will be worth it!) the line where the wrinkles formed will be our guide on where to put more weathering.


Load a brush with more acrylic/fabric medium paint and paint along the wrinkle line. After a few seconds, lightly blot away and repeat and feather the edges until the correct amount of shadow is achieved. Lastly, lightly pat away excessive paint with paper towels.


The end result is an antiqued bag! You can use this technique for other textiles as well. Just add fabric medium to make sure the acrylic paint sticks to fabrics.

Thank you so much for reading and I look forward to seeing you at Expo! Sign up for my classes on Saturday (#2806 Easy Grading Costuming Patterns to Best Fit Your Body & #3825 Advanced Grading Costuming Patterns for Perfect Fit)!
About the Author: Anna He is a costume designer and cosplay artist based out of Seattle. She has designed patterns for McCall and has worked for brands including Norma Kamali, Eileen Fisher, and Nordstrom. Get to know more about Anna and her work at Expo in her two class offerings or at seattlecosplay.com.