Social Media Takeover!

By the Sewing & Stitchery Expo

We’re excited to introduce our social media takeover hostesses for 2020 Expo: Rhonda Pierce and Annette Millard! Rhonda and Annette are both Expo and social media veterans. During Expo, our social media will be filled with content from Annette and Rhonda, who will give you the 360-degree Expo experience. See what it’s like to be a teacher, follow them on Instagram stories, and look through their Expo highlight photos. There is a lot to do at Expo, and Rhonda and Annette will make sure you see as much of it as possible. If you don’t already, follow us on Instagram, like and follow us on Facebook, and follow us on Twitter!

Rhonda and Annette have written introductions, so read on to learn more about these two amazing Expo attendees, supporters, and teachers!
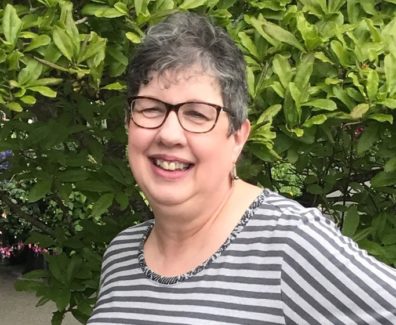
Rhonda Pierce

Hi, my name is Rhonda Pierce. Thanks to you, I have a dream job…teaching sewing enthusiasts about the most important 2” of steel in the sewing machine. As spokesperson for SCHMETZ needles North America I love traveling with the SCHMETZ “Super” Needle – it’s 17” tall. I enjoy asking “What’s your favorite SCHMETZ needle?”

Sewing & Stitchery Expo is my favorite North America sewing party! For over 10 years I have enjoyed this show as vendor, speaker, shopper, student and Facebook hostess. Many of my delightful friendships originated at this Expo. If someone is timid to attend this show alone, I urge them to take that initial step. Almost instantly you will find yourself surrounded by friends that share your love of sewing. Get here. Take classes from instructors that you read about and see on TV and online. Shop the vendors with ease in, not just one, but two buildings. Chat in the food court over the famous raspberry scone, or my favorite French crepe in the food court. So many choices.

If curious, get a glimpse from last year’s Expo, take a look at my personal blog with lots of pics:  https://sewmorestitches.com/blog?blogcategory=2019+Sewing+%26+Stitchery+Expo

You will notice that attendees wear layered clothes for uncertain weather and comfy shoes to keep a kick in their steps.

This year I will be giving two SCHMETZ lectures, seats still available, and two already full SCHMETZ Hands-On Exploratory classes. During Expo, join me on the Sewing & Stitchery Expo Facebook showing vendors, attendees and the vibrancy of four sewing days. I hope you will join me.

And remember, needles don’t last forever. Change the needle!  Let’s sew!

Sew SCHMETZ & Grabbit Too!

-Rhonda


And now, hear from Annette!

Annette Millard

I learned to sew from my Mom, as she did from her Mother, and I’ve been sewing for as long as I can remember. My love of sewing centers around making a handmade wardrobe, but I do love to make bags and smaller projects, too. I guess if it involves sewing, I’m there! My first trip to Expo was about 30 years ago with my Mom and my 2-year-old in a stroller. Since then, I’ve been involved in working in a booth at the Expo, attending every year and teaching classes for the last six years or so. When I’m not sewing or teaching, I do freelance writing and social media for the sewing industry. In between all of that, I maintain my own blog, The Sewful Life, where I share the joy of stress-free, enjoyable and successful sewing. And, yeah, don’t ask me about housecleaning!

Teaching at the Sewing Expo is an honor and a thrill every year and one of the best things I do! This year I will be teaching four classes: Modern Kantha Stitching, Common Sense Fitting, Cork Tote, and Social Media for Sewists, and presenting a Free Stage Class on Contemporary Kimonos. Just a few things! And, I’ve been invited to help with Facebook and Instagram during the show, which will be sew much fun. I’m SUPER excited to attend the Friday night event with Kenneth King this year, too!

Annette’s favorite things at Expo:

[I like] hanging with my people – those who understand the power and bliss of sewing! I love seeing old friends and making new.

The inspiration of the show as a whole. There’s so much creative energy buzzing through the aisles and it keeps me going all year.

Shopping is a close tie with Classes and Events. Even after so many years of sewing, I always see new fabrics, patterns, tools and notions in the booths and learn so much from classes (when I’m not teaching!), stage presentations and the evening events.”

Advice for attendees?

Make a plan before you come. Use the brochure and that wonderful new app and map out where you want to go and what you want to see. Wear your walking shoes, bring a tote bag or two and get ready for the most amazing sewing experience in the USA.

My go-to lunch for many years has been the Gyros Sandwich. It’s yummy, reasonably nutritious and the people in that booth are just awesome.

My favorite events are the American Sewing Guild and 4-H Fashion Shows. I love seeing what real people have sewn and the joy they have in wearing it. And, those 4-H kids are AMAZING!!

What would you say to someone who is debating coming to the Expo?

Just. Do. It. I know it may be far away and you may think you have enough fabric, but one thing I know you don’t have enough of is inspiration and connection with other sewists! It’s tough to describe, but gathering with your “tribe” is powerful in ways that will surprise you. Making things by hand is so good for us in this hurry-up, digitally obsessed world. You just can’t lose!

Any last thoughts you want to share?

I guess I said a lot already, but I’ve seen how sewing and quilting can transform lives. There’s a spark of joy in the eyes of someone just learning that is magical. We have to keep that spark going. We have to keep making and we have to connect together. Bring someone younger with you and pass on the passion. And, if you’re the someone younger, congratulations, you’ve made a life-changing choice that you’ll never regret and we’re all proud of you!

-Annette

We hope you have an amazing Expo experience, and that our community grows stronger through engaging on social media. Remember to follow our pages and tag your pictures and posts with #sewexpo and #sewexpo2020. See you there!

Pendleton Expo Deals!

By The Pendleton Woolen Mill Store

We are looking forward to seeing you during the Sewing & Stitchery Expo. This is one of our favorite events of the year, and we can’t wait to unpack our trailer, set up our booth, and show you our array of gorgeous Pendleton fabrics and notions for your projects. In fact, we would like to see you each and every day of the Expo! So we are planning some amazing daily promotions.

Thursday – We are all in on select stripes! 60% off your favorite pattern for summer.

Friday– It’s a denim day…yes, we have select Pendleton WoolDenim® and on Friday, it’s 50% off.

Saturday– Our favorite day is Plaidurday! Select wool plaids will be 60% off to celebrate.

Sunday– A heavyweight sale on select heavyweight wool fabrics, 50% off on Sunday only.

You’ll find wonderful ideas, fabrics, suggestions and inspirations every single day of the Expo at booth #404-410. And if you visit on Saturday wearing the 1949 Jacket you made—or a Pendleton 49’er jacket—you will receive a special gift. And yes, the 1949 jacket pattern will be there, for those of you who are still waiting to make your own.

We will see you there! And you can find us all the time at: www.woolenmill.store

Friday, Feb. 28th is “Wear Your Retro to Expo Day!”

By Laura Nash

The Sewing and Stitchery Expo has long been the place to show off your creative garment finesse, and this year will be no different! Having attended the Expo as a vendor since 2012, year after year it’s been a pleasure to watch people go from simply reminiscing to boldly embracing the mainstream return to vintage. Have you made the move to retro? If you like to feel beautiful, confident, and love getting compliments, then why hesitate?

Hello, my name is Laura Nash and I am the owner, designer, pattern maker, and instructor at Sew Chic Pattern Company where I design “Modern Patterns with Vintage Style”  at SewChicPatterns.com. Today I’m going to help you visualize how easy it is to make the move to retro, and hopefully debunk any arguments you may have against adopting this trend for yourself.  So get ready to plan your Expo retro wardrobe!

Retro Style, also known as “vintage-inspired,” is about a return to the clothing styles of the early first half of the 20th century and ranges from totally authentic looks to second-hand vintage or new vintage inspired separates that are paired with totally modern elements and accessories.

What is truly vintage can get confusing, but typically garments have lots of unique details, use classic fabrics, and feminine silhouettes. Pair your outfits with a simple Mary Jane or ballerina flat shoe. Classics like these can go with anything.

To give your outfit a more authentic air, add accessories such as belts, gloves, a small hat, or a fastener.

If you’ve never worn a petticoat before, you can ease into it with a petticoat with less fullness. One word of caution.  Not enough fullness or fullness in the wrong body areas can add visual weight. What you are looking for is structure to enhance the shape and silhouette of your dress or skirt, filling in the area around your legs. The fuller your skirt circumference or the heavier the fabric is, the more fullness your petticoat needs to help the garment hold its shape. Lighter fabrics and less fullness look great with a lighter petticoat.

My standard go-to top for skirts and pants is a plain (often white) t-shirt worn with a button down sweater that matches my separate. I admit that I have a whole drawer full of these sets!

Retro need not be form-fitting. At first glance, this is the pattern everyone calls my “Lucille Ball” outfit! Envision yourself wearing this stylish silhouette!

Have you ever said to yourself  “I’d like to wear retro” but think you’re just too old? Let me introduce you to Judy! Isn’t she adorable in this cotton house dress? She is the focal point of the room! Age is no reason to avoid wearing what you love.

Maybe you think you can’t wear retro because you have a full figure?  Not so! Wear styles that smooth over the tummy, flare at the skirt and broaden the shoulders to give the illusion of an hourglass figure.  Notice how my friend Jocelyn has accessorized with a bright bag and wears a flower in her hair to draw the eye to her face. These bright colors make us happy to just look at her!

Think creatively when considering your favorite retro looks. Southern Belle displays formally but is easily made to look casual and visa versa as above.

As with any project, I encourage my students to add a unique detail that will lean it toward their personality and give it that “pizzazz” that makes it uniquely their own. If you’d like more info on how to dress retro, check out my One Neeedle Expo class #1039 “Harmony in design, dress, and body type” or my trunk show #1040 “Style Me Vintage.”

Join me and my booth crew at the Pavilion  #925/923 at 5 p.m. Friday for a little soiree and celebrate your style of Retro with us!

Design Inspiration: Where to get Ideas for Mixed Media Clothing

By Susan Lazear, Cochenille Design Studio

Lately fashion has been highlighting what I call mixed-media designs. Parallel to mixed media art, mixed-media fashions involve more than one textile/sewing technique. It has been my experience that most creative fiber people practice more than one form of textile art. So, if you sew, knit, stitch, crochet or dabble in a plethora of related textile arts, you are the perfect candidate for creating unique and one-of-a-kind clothing. Just do it!

Where does one begin?

I like to be inspired by the world around me. My resources are varied and when time permits, I like to clip, sketch, and pin the ideas that present themselves.

Pinterest

Pinterest is a great friend for this. It is easy to set up interest boards so you can curate your inspirations. I have numerous, and yes, I have several related to mixed-media fashions. Go check them out? Start your own interest board, and pin, pin, pin.

Combining Fabrications

https://www.pinterest.com/thinkdoodlemake/combining-fabrications/

Pieced Garments

https://www.pinterest.com/thinkdoodlemake/pieced-garments/

Details

https://www.pinterest.com/thinkdoodlemake/details/

Embellishments

https://www.pinterest.com/thinkdoodlemake/embellishments/

Lagen Look Styles

https://www.pinterest.com/thinkdoodlemake/lagenlook-styles/

Upcycled Sweatshirts and T’s

https://www.pinterest.com/thinkdoodlemake/upcycled-sweatshirts-and-ts/

And here are a few boards from other people related to Mixed Media:

https://www.pinterest.com/jemorrissey/clothing-in-mixed-media-styles/

https://www.pinterest.com/AlabamaChanin/

https://www.pinterest.com/annawalden/a-right-now/

https://www.pinterest.com/marjoleinstof/

Key words to use when searching Pinterest would be:

Altered Couture, Mixed Media Fashion, Refashioning, Mixed Media Dress Clothing, Fiber Art Clothing, etc.

Did you know that you can print the images from a Pinterest board? I have done that with a few of my boards for quick reference.

Flickr

Flickr is a hosting site for photographic images and videos. Here you can search by theme amongst the thousands and thousands of images. Try “mixed media fashion”. You might also want to read up on the Creative Commons license page if you want to use images on your blog, or otherwise.

https://www.flickr.com

Follow Fashion Lines

There are several companies and fashion designers that share an interest in mixed media or embellished clothing. Here are a few suggestions:

Sundance

This is Robert Redford’s collection of fashion, interior and home items. Although it varies from time to time, you can find a lot of clothing that features a hand-crafted feel, and often these involve more than one textile art.

https://www.sundancecatalog.com

Anthropologie

This well-known store has always carried garments that have that hand-crafted look. You will find a lot of embellishment, mixed techniques and related both in the store and online.

https://www.anthropologie.com


Santa Fe Dry Goods

This is a store in Santa Fe, New Mexico. Although I can’t afford practically all of their clothing, I never miss going into the store when I visit, as it is so inspirational. They carry many designers/lines from around the world, many of whom you may not know. I love the silhouette and garment ideas in general, but often, you will find designers who use mixed media in their work, or who focus on a specific textile art. Their website is great, and I would recommend getting on their mail list. Check out Sacai, Uma Wang, Péro, or Gilda Midani.  I also like how you can view their clothing. They provide multiple views, zooming, and they not only list the details of the garment, but the tell you how tall the model is, so you can have an idea of proportion. Be careful of the Sales page; you may indeed find something you want!

https://santafedrygoods.com/

Google Search

 – Mixed Media Clothing or Mixed Media Fashion

A simple Google search will bear lots of interesting results. Below are a few links that came up.

https://www.dallasnews.com/arts-entertainment/2017/02/17/fashion-mma-earn-your-belt-by-mastering-mixed-media-prints/

https://www.behance.net/gallery/53438773/DOLLZ-Fashion-Mixed-Media-Project

https://www.newyorker.com/magazine/2019/09/09/sterling-rubys-mixed-media

Are you inspired yet? It’s time to brush up on your various textile arts, and plan a garment yourself that uses multiple mixed skills. Not only is it a lot of fun, but it is a guarantee that you will not see yourself walking down the street. A further bonus is that often you can use up small bits of fabric, here and there, or leftover yarns.

I use Garment Designer software to aid in my projects. I can quickly make a pattern to use in various ways; combining knits with sewn, splicing pieces, etc.

https://www.cochenille.com/garment-designer/

So, onwards, and enjoy!

Susan Lazear is a Professor at San Diego Community College and the owner of Cochenille Design Studio, a company that develops software for sewers, knitters, and other fiber crafts. She will be teaching a variety of classes at Sewing and Stitchery Expo.

How Your Favorite Sewing Patterns Can Be a Smash Hit Today

By Anne Whalley

Be sure to check out this post and more on Anne’s blog and website – annwhalley.com!

How can I be using the same patterns today that I sewed yesterday (over 40 years ago)?

The patterns I have aren’t my size anymore but I’m still sewing them!

(With apologies to John & Paul of Beatles fame)

Yesterday, all my troubles seemed so far away

Now it looks as though they’re here to stay

I could sew a Vogue Size 12 and wear it every day

Oh, I believe in yesterday

Suddenly, I feel I’m twice the size I used to be

There’s a shadow hanging over me

… cos my body isn’t what it used to be and here are the reasons why:

  • having children = body changes

  • Worklife shift rosters, irregular hours

  • sitting in front of a computer

  • cafeteria food

  • eating on the run

The patterns I chose suited my body and they fit.

The battlefield of daily living and my body changes meant I had to find patterns for my larger body that suited my new plus size …. as making adjustments made me apprehensive

A body is “3 D” and patterns aren’t. My waist measurement is probably the same as someone else’s but they may not have a sway back.

Since I have had my Pants Block, I have saved a truckload of time and my precious fabric.

I’m a deadline sewist and I use my Pants Block as a template with commercial pants patterns. I love my size 12 Vogue Designer Patterns and I still use them. I haven’t stopped loving those design details that give me the vibe I’m after.

Double D is a reality in my Bodice Block. Measurements are a guideline but the final fit adjustments are what make the garment customized for my unique shape. Having a block gives me the confidence to cut my Fabric and Sew it up. I’ve got my “3D me” (my Block Pattern) that I can use as a template with my multi-sized Pattern Collection … giving me the look I’m after with the fit that works for my body.

I’m not sad about not being a size 12 anymore. I’m glad my body has stood the test of time and I’m not going to let it stop me from sewing and wearing the clothes I love to make. Shopping for RTW takes an eternity and there aren’t as many choices … colour or fabric wise … and I want to wear what I feel comfortable in. I’ve already got the fabric and the patterns. The money has been spent. I may as well Shop My Stash, sew it up and enjoy wearing it.

I’m teaching Three X Two Needle Classes at the Sewing & Stitchery Expo  Feb 27 – March 1st, 2020.

These three classes will help you see the importance of Using a Block Pattern, how to get more out of your Block Pattern with Commercial Patterns & how to choose the best fabric and patterns for your body shape, height, and lifestyle. When you see my presentations you will be able to apply what you have learned to your future sewing with the fabric you have .. for the outfits you want to Sew .. and love to Wear … when you get back to your sewing space. Your wardrobe will never be the same again!

About the Author: Anne Whalley, the Pattern Whisperer, is passionately focused on providing image makeover services with the highest levels of customer satisfaction. She has a background in sewing, fashion and styling. Check out her blog and website annewhalley.com! You can also find Anne on social media. 

The Pinch Test: The Key to Understanding Fit in Clothing

By Susan Lazear

Sometimes the simplest things in life are the ones we don’t easily see. I would say this is true with sewers and knitters, and crocheters when it comes to understanding how much ease they like in their clothing. When I’m teaching patternmaking or fitting, and helping people create or edit patterns for themselves, I’ll often ask individuals how much ease they want in the style. And.. I’m often met with a questioning stare. There are some simple tactic, which I term “Understanding your Fit Preferences” and one of these involves an understanding of the ease you like in your garments.

What is Ease?

There are two types of ease: wearing and style. Wearing ease is what you need in a garment to breathe, sit, and move. On average, based on a size 10/12, one needs 2 inches at the bust and hips and 1 inch at the waist. This increases/decreases slightly if your body size is larger or smaller, respectively. Of course, if there is spandex in the fabric or you are working with a knit, you don’t need as much. Style ease is the added ease that helps define the style. An oversized boxy garment could have 32 inches of ease at bust/hip, and a fitted jacket might have simply the wearing ease of 2 inches at bust/hip.

If you are going to design or edit patterns for sewing, or fit commercial patterns prior to cutting them out, you need to develop a sense of how much ease you want in the garment. If you are going to knit or crochet, you need to take the time to understand the schematic of your pattern, and if it is not provided, you should make one based on stitches/rows and your gauge.  The best way to understand your personal ease preferences to make a date with your closet and use what I lovingly call the ‘Pinch Test’.

The Pinch Test

The Pinch Test involves simply putting a garment on, and pinching out the ease at the appropriate places, typically the bust and/or hip. Pay attention to the weight and drape of the fabric as this plays a key role in the amount of ease used. Typically, garments made with soft fluid fabrics may have much more ease than garments made with stiffer fabrics. Measure the pinch and multiply it by four to calculate how much ease is in the garment. For example, if you get a two-inch pinch, you will have eight inches of ease in the garment in total (2” X4, which includes the left and right, front and back). The goal is to learn as much as you can about your favorite garments, and ease preferences is a key item.

So, grab a notebook, a measuring tape, and a handful of your favorite pieces. Begin by measuring your own body measurements to notate your bust, waist. and hip. Now, make a chart and create columns; Garment, Style, Fabric, Ease Pinch: Bust, Ease Pinch: Waist, Ease Pinch: Hip.

Put a garment on and pinch out the ease. It helps to hold the center of the garment in place, as you pinch at the side. Now, measure the depth of the pinch. Write it down. Continue through your group of garments, completing the chart as you go.

Photos:

If you multiply the pinch depth by four and add it to your body measurement, you will know the circumference of the garment at that point.

Try a couple of different garments that have different fabrics, and levels of fit. My black top is fitted at the bust, but is an A-line, so less fitted at the hips. It has a 5/8” pinch at the bust which equals 2-1/2” total ease. (5/8” X 4). At the hips I get a 3” pinch which equates to 12 total inches of ease. If I add those two measurements to my body measurements (38” bust and 40” hip), then I can see that my pattern would need a total perimeter of 40-1/2” at the bust and 52” at the hip.

My print jacket is a semi-fitted double-knit which has some ‘body’ to the fabric. Both my bust and hip pinches are the same at 1-5/8”. Thus, the total ease at both the bust and hip is 6-1/2”.

My orange sweater is made with a firm knit, and it is a boxy style. The bust pinch is 3 inches and the hip pinch is 2-3/4 inches equaling a total of 12 inches ease at the bust and 11 inches of ease at the hip.

Not only is the information you gain from the pinch test handy; it is invaluable. Use it prior to scrutinizing a commercial pattern, prior to cutting your fabric, or to adding ease when you are drafting your own. You have just given yourself the ammunition you need to create or modify patterns so that there is no surprise or disappointment… and what about the elimination of muslin sample? Now, that is cool!

You can seem my notations in the chart I created in Excel. Eventually, this information will become ingrained, as it moves to knowledge as opposed to data.

Using What You Have Learned

There are many ways to use the knowledge you have just gained:

  • If I were working with commercial sewing patterns, I would lay the pattern flat on the table and measure its width at bust/waist/hip. Then, by subtracting your bust/waist/hip, you can easily calculate how much ease is built into the style and determine if it suits your fit preferences, given the choice of fabric. If it doesn’t modify the pattern.
  • If I were going to knit or crochet a pattern, I’d look at the schematic and compare it to my body + ease measurements to see if the pattern and its ease suit my taste and the hand/drape of the knit/crochet swatch I just made. If it doesn’t modify the pattern.
  • When I design patterns (by hand or on computer), I am beginning with my body and a style, and so I simply ensure that I have the desired ease.
  • Garment Designer software users can look at the ease easily when they create patterns, and if the Sloper is turned on, it is easy to see and measure the ease in any style. So, pinch test information can slide directly over to the pattern.

Over Time….

Keep adding to your chart; in fact, make it become a morning mantra to pinch out the ease on whatever garment you are wearing for the day. Always make a mental note of the style (fitted, semi-fitted, average, over-size, etc.), and the fabric.  Soon you won’t need to refer to the chart, and you will simply ‘know’.

Perk?

The Pinch Test is a great tool to use in the dressing room when you are trying on clothing. I use it all the time to evaluate a style so I can recreate it at home. I’ve gotten pretty good at eyeing the depth of my pinch and determining how many inches it is.

Susan Lazear is a Professor at San Diego Community College and the owner of Cochenille Design Studio, a company that develops software for sewers, knitters, and other fiber crafts. She will be teaching a class at Sewing and Stitchery Expo called “Fit Preferences: Understanding How you Like Your Clothes to Fit”. There you will learn more about the Pinch Test and other helpful information.

Awakening My Design Eye

By Marlis Kuusela – Owner of Flair Designs

Laws of Attraction

When fabric patterns or designs catch my eye, an inner voice says, “I like that!” I usually get a warm feeling that accompanies the discovery, grateful for the chance to find a new treasure that makes my life richer. Many times, I go on without analyzing why I like it and place the experience to the back of my mind and wait for other things to follow. Over the years, customers have asked me, “How or where do you find the beautiful items you have for sale?” or, “How do you get your ideas for garments?” My answer to these questions is: “The items I have for sale and my design ideas find me without a conscious effort.” These special objects or solutions to problems always show up at the most unexpected times and places. I have taught art for many years, I know what I like in terms of design elements and I am open to seeing similarities and crossovers in different mediums. This awareness allows me to notice similar things in my environment. People that know why they like something are much more likely to attract and notice those things around them.

Awakening a Design Eye  

   So, how do you awaken your design eye if you are not sure of why you like or dislike something? All of us are capable of improving our sense of observation.

We must develop an awareness with purpose.

As you see something that strikes your fancy, analyze why you like it in terms of the elements of art. *

Better yet, write your thoughts down and take pictures to jog your memory. This intentional thought will hone your inner design sense and sharpen your awareness of the environment.  You will begin noticing more and more things that are similar, in short, they will offer more opportunity for you to be aware of your design eye. For example: this wallpaper design  was drawn by William Morris. The following analysis tells why I like the design. 

Analysis of William Morris Design

Color: It contains various values of low intensity colors and uses a limited palette. Ex. Light, Medium, Dark Olive Green-Light, Medium, Neutral Rose.

Shape: It uses intertwining wild rose vine in lattice and relies on perspective to create a 3D image on a flat surface.

Value: The shading is incomplete; some areas are colored while others are just line and the shading is reversed…see space below.

Space: Some positive space shaded (flowers), some negative space (behind the lattice).

Visual Texture: Thorns, wood grain…some textures left incomplete, while
others are detailed.

Line: Undulating curves are woven around straight lattice lines. There are many areas of detailed drawing vs. sketch which gives a feeling of selective focus.

Notice I tried to be as specific as I could in the element descriptions. For example, under color I tried to describe specific qualities of color, not just I like the color.

Art Elements

If you are unfamiliar with definitions of the art elements, the chart gives a basic description.  Elements may overlap, for example, colors contain value, and lines may have texture. Being able to pick out these qualities in design helps you zero in on what you like and just as importantly knowing what you do not like.

Seeing these Elements in your Environment

Once you have made note of these elements, you will begin to notice them in your surroundings.

As an example: the color scheme of muted pinks and greens was used in a book cover for a mail order catalog with sweatshirts to match. These colors remind me of the Morris Design.

   Nature is always a good place to find inspiration. Trees, leaves, or patterns on animals are endless. Catalogs like Sundance, Coldwater Creek, and Soft Surroundings, to name a few, are great places to look for design and frequently are inspired by nature. Remember, it is just as important to figure out why you don’t like a design, as like it. You learn just as much from your dislikes, as well as, your likes.

The Creative Stew

Letting your newly found likes and dislikes slow cook is part of the thinking process, so don’t rush yourself. You probably won’t use all of the ideas in one project. You might find you like and often use only a couple. Be open to changing plans as you work and welcome mistakes which drive us to new solutions. The following images show art elements in my previous projects which share qualities in the Morris design like: muted color, reversal of positive and negative space, undulating line, and visual/tactile texture. Notice how very different they look from his work, yet they share commonalities.

The throw vest above uses the olive-green muted value tones and reverses positive and negative space. Each vest side and trim are the exact opposite color of one another. The textural fringe on the lapels contrasts with the smooth chenille woven yardage.

Element analysis will make your design eye clearer. 

Finally, keep in mind there are no right or wrong design eyes. Be true to your thoughts. The more you practice this exercise, the more things will find you that relate to each other. This awareness will make your life richer and will make you a better designer as you awaken your design eye.

Intertwining line, undulating shapes, clear versus incomplete focus and reversal of light and dark are hallmarks of the wall hanging, necklace and jacket. Muted colors, asymmetrical piecing, and high value contrast are also standbys for my design eye.

Sushi Wall Hanging – Below


Jigsaw Airbrushed Necklace


Liberty Shirt with Flair


About the Author: Marlis Kuusela created Flair Designs in the early 1990’s to sell her airbrushed fabrics to quilters and garment makers. She continues to teach creative thinking and sell her fabrics to a loyal clientele nationally and internationally after 30 years. Check out Flair Designs on Facebook!