The Sewing Guide for Holiday Dressing

The Dilemma
Awww, the Holidays. ‘Tis the season for your work party, his work party, a girl’s night out or two, holiday concerts, and all the family gatherings . . . . whew! What’s a sewist to wear without making a new outfit for every occasion? Enter the classic Little Black Dress. Simple and economical to make, it can easily be the most versatile go-to in your holiday wardrobe. All it takes is a little more sewing!

The Solution
The Little Black Dress on its own can be fabulous with just the addition of jewelry that sparkles or a drop-dead-gorgeous print sewn into a quick infinity scarf. For your holiday LBD, consider one of the patterns I found on the Simplicity web site. Each one carries its own impressive style, yet is simple enough to sew up in just a few evenings.

Image Source

From the Amazing Fit collection, Simplicity 8258 is available in petite, misses and plus sizing. Fitting tips and techniques are included for this impressive, yet simple design. The fit and flare styling, center front seaming and three sleeve options make this the perfect LBD for everyone. And, there are pockets!

Image Source

Designed by Sew Chic’s Laura Nash, vintage inspired Simplicity 8534 features a gorgeous, slimming waterfall drape. Easy pleating at the bust and waistline creates a wonderful fit and marvelous style. To make this your own, options include long or short sleeves, optional self-piping and a charming bow.

Image Source

Basic, easy, yet striking, New Look 6524 includes four different sleeve looks and lengths. It’s a wonderful dress for “The Year of the Sleeve”! Sew up a holiday style Little Black Dress now, then save this pattern for a fun warm weather dress, too.

The Additions
So, now that you’ve sewn the perfect LBD, just a little more sewing will make it a great fit for all your holiday events! The layering styles I found for you can change for each occasion depending on which fabrics you choose and the unique touches you add.

Image Source

Think about silk, velvet, rayon, sparkly trims, sequins and fancy machine stitches. For embellishing, consider Dana Marie Design’s exquisite Quick Fan Applique tutorial to add personalized style.

Image Source

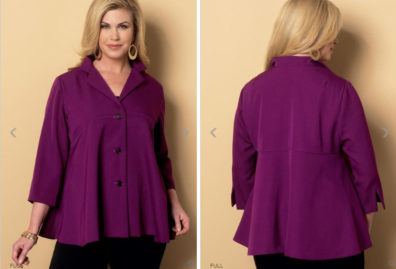
Connie Crawford’s Butterick 6261 is a magnificent flare jacket with beautiful seam detailing. Marvelous for combining prints, it could also stylishly feature a yoke of sparkly, sequined fabric. A wonderful way to complete your outfit for holiday concerts or a dress-to-impress work party!

Image Source

For a more formal office party or girls’ night out, you’ll love the New Dimension Jacket designed by Louise Cutting. Beautiful princess seaming and full-length dolman sleeves create a slim, flattering fit that would be superb in velvet or a mid-weight silk. Two necklines and optional pockets offer alternatives for design that may mean you’ll want to make more than one!

Image Source

Karen Nye’s fabulous and ever-popular CNT Patterns A Little Somethin’ Jacket is quick, easy and a great fit for all body styles. You’ll find two sleeve lengths available and a wide size range. Stitch this one up for the family gathering in a gorgeous rayon. For a Holiday Concert or special night out, choose a dazzling lace for spectacular results.

The Joy
Get ready to look fabulous, darling. Choose your fabrics; choose your patterns – holiday dressing offers simply marvelous reasons to indulge in the joy of sew!

About the author: Annette Millard recently started her own blog, The Sewful Life, which utilizes her sewing and teaching experience to provide helpful tips and tricks, tutorials, and project ideas. Visit the blog at sewfullife.com .

Sew Checklist: Mailing List and Hotels

As many are preparing for the holidays, we here at the Expo headquarters are ramping up for another exciting Sewing & Stitchery Expo! Amidst this busy season, we want to ensure you all are prepared for what’s to come.

Our team is busy preparing the brochure to be mailed out in December. To make sure you get your copy on time, please sign up for the mailing list by selecting here if you have not already done so. Classes reach capacity quickly so you will want to have your picks selected and on hand when tickets go on sale!

Additionally, as March approaches you should be thinking about where to stay. Hotels in the area fill up very quickly for this event so make sure you check on this early! For your convenience, select the link to see the list we have compiled of possible accommodations in the area.

We encourage you to follow and “like” us on our social media outlets. Stay up to date on all things Expo and share your projects and ideas with others! Scroll to the bottom of the website and select our social media links on the right.

We look forward to seeing you at the Expo!

Pattern Sizing Made Simple

We’ve all had trouble shopping for clothing before. Go to one store, and you’re one size; go to another store and you may be a size or two bigger or smaller. Even sticking with the same brands doesn’t always help: what fit you in the fall may not fit you in the spring, and that may not even be the fault of seasonal holiday foods! The truth is, manufactured clothing sizes are always changing, thanks to the trend known as vanity sizing. But shouldn’t you expect the same kind of sizing struggle from sewing patterns? The answer is: NO! Choosing a pattern size is much, much easier than trying to find things that fit in the stores. All you need is a little bit of math, a measuring tape, and the handy measurement chart on the back of your pattern envelope.

Why do we need to measure? Can’t we just choose the size we buy in stores? As we’ve already discussed, those sizes and measurements vary from company to company, and even season to season. Pattern sizing, on the other hand, is standardized. That means that a size 10 from Simplicity is always going to be a size 10, no matter which pattern you pick up—and it’s the same for the other major pattern brands, too! All you need to do is take four basic measurements.

Now, before you get measuring, make sure you’re wearing the undergarments you’ll be wearing under your finished garment, and make sure there’s nothing in your pockets!

First, measure your full bust, around the widest part of your chest and straight across your back. Next, measure your natural waist—right below the base of your rib cage, not down at your hipbones! Next, measure your full hip, around the widest part of your bottom. This is usually about 9” below your waist. The last measurement you need is your back waist length. This is usually easier with a friend’s help. Your back waist length is the distance from the top of the knob at the base of your neck where your back starts, to your natural waist at your center back.

Now it’s just a simple matter of comparing those numbers to the size chart on the back of the pattern envelope. But what if you fall between two or more sizes? Well, that’s not a problem! Thanks to Simplicity’s multi-size patterns, it’s a snap to combine pattern sizes! Just take a felt-tip pen and draw a smooth connecting line between cutting lines for the sizes that best fit you. And one more tip: Simplicity’s Misses’ and Women’s patterns are designed for someone 5’5”-5’6” tall, so if you’re taller or shorter you’ll need to adjust the length of your finished garment. Most patterns will include instructions on how and where to do this in the General Directions section of the guidesheet!

About the authors: Deborah Kreiling and Tiffany Pegram work with Simplicity. If you’re still not quite sure if you’re doing all this right, you can view our in-depth sizing guide at www.simplicity.com/sizehelp. Or, for a more personal touch, just reach out to Simplicity directly! You can reach us by phone at 1-888-588-2700 or by e-mail at info@simplicity.com. Or, stop by one of our many social media channels, we’ll be happy to chat!

What is a Serger and Do I Need One?

I want you to close your eyes and remember what it was like to sit or even see a serger for the very first time. My experience was in 1981 when I was touring colleges. I walked into a classroom and it was filled with many different machines, including a small machine with 4 threads on it.  Of course I was curious and walked over to it. The instructor said sit down and try it. And just like you, I said, “Oh no thank you. I have no idea what it does or how it works!”

I’m sure some of you felt the same way when you first laid eyes on your very first serger and now you wonder what you ever did without it. Right?!?

Initially, most home sewers used the serger primarily for edge finishes or to create sturdy, fast seams. A regular sewing machine can do the same but the serger trims and finishes the edges at the same time giving the item a professional finish in less time.

Sergers have come a long way since they hit the consumer market. Today, there are so many specialty feet to make your serging less tedious. Some of you may still wonder if the investment is necessary.

Let’s take a look at how serging can help you no matter what type of sewing you do.

Quilting: piece using either a chain stitch or a 4 thread over lock and because the feed system is longer your fabric will not shift or move, the 4 thread over lock stitch will also compress a bulky quilt as you go seam Crafters will Love the narrow rolled hem and differential feed when making ruffles of any kind.

Use a narrow cover stitch for fixed gathers and an over lock for adjustable gathers.

Heirloom sewing has never been easier and there’s no need to stitch in the ditch, trim with a scissors and zig zag when inserting entredeux or bridging. Simply attach a clear foot set your stitch for a narrow 3 thread and serge in place the 3 step process is completed all at one time. Not to mention the beautiful pintucks that can be made with a narrow cover stitch.

New to sewing? Sewing knits or active wear will make your sewing experience a real pleasure and the versatility you have in working with decorative thread will bring your projects to the next level.

Don’t shy away from your machine. If you already own a serger, do something different or try a new pattern with serger detail stitching. If you are thinking about buying a serger, take advantage of classes and special events hosted in your area to learn about what a serger can do to make your sewing time fun, fast and productive. You will find the machine you thought only finished seams can do so much more.

About the Author: Pamela Mashie is the Education Manager for Baby Lock. www.babylock.com 

What Sewing Machine Needle Should I Use?

Does this question sound familiar?  With so many beautiful and luscious fabrics available in the marketplace, fabric selection has never been greater.  When sewing with wovens, knits, stretchy knits, sequin, oil cloth, tulle, batiks, velvets, you are bound to ask, “What needle do I use”?  With all of the needle types available for the home sewing machine, how does one choose which one to use?  Just as the name suggests, Universal is the most popular needle type because it works well with woven and knit fabrics.  BUT, stitch quality frequently improves with a more appropriate needle choice.  How do you know what needle to use?

The needle name is the first clue.  Quilting needles for piecing and quilting projects.  Denim needles for jeans and denim raggy quilts.  Jersey Ballpoint needles for jersey knit fabrics.  However, not all fabrics have a same name needle.  Rather than trying to remember what needle to use with what fabric, use technology to help you out! There are several mobile apps available that can assist you. Search your app store for needle selection, and find an app that can help you make these decisions.

Choosing the right needles is just the first step. Like so many other things, needles wear out, too! Yes, you really do have the change the needle, after all the needle is not a permanent machine part.  The needle is meant to be changed.  To tell when to change your needles, check out the “Change Your Needle” clues.  Use the needle too long, and you will see compromised stitches, shredded threads and damaged fabrics and hear the difference in clicks, pops and clunks!   Remember needles do not last forever!

By selecting the right needle and being sure to change it when needed, your projects are on their way to the sleek, smooth stitching you desire.

About the author: Rhonda Pierce is the spokesperson for SCHMETZneedles North America, www.schmetzneedles.com.

Welcome to the Sew Expo Blog!

We know how exciting it can be to start a new project. We know how satisfying to can be to make a current project even better. That’s why we’re partnering with some of sewing’s most influential personalities to bring you new ideas and updates.

Check back here for helpful pattern and equipment tips along with inspiring articles to ignite your creativity!

This is also the place to get the latest announcements regarding the Sewing & Stitchery Expo–including ticket sale dates, new classes, scheduled teachers, and much more. You won’t want to miss anything–so sign up for our newsletter and blog updates now!