A Marvelous Sewing Addiction – The Modern Kimono

The Kimono that began my addiction. Stitched from Sew Caroline’s Florence Kimono pattern in an Aztec sweater knit with added fringe.

An Easy-to-Sew Fashion Star

The humble yet classic kimono is a huge star in current fashion and its popularity is on the rise. Seen on the runways as well as in the grocery store aisles, it’s a versatile garment that can be worn by almost everyone. The kimono’s comfortable yet simple shape holds so much possibility within it’s easy fitting lines that easily lend themselves to every occasion from holiday to casual. Today’s fun, quick to make kimonos are the perfect canvas for beautiful fabrics and embellished designs. Perfect for those of us who love to sew our own handmade wardrobe!

If you’ve never made or worn a kimono or decided they’re not for you, keep reading. I’ve developed an obsessive Kimono addiction that I’d love to share with you! A basic kimono can be cut, sewn, and ready to wear in four hours or less making it an excellent choice for a last minute garment! Most kimono patterns consist of just three basic pieces: front, back, and sleeves. They may be finished with bands around the neck, front, and sleeves or facings. Every handmade wardrobe should contain a comfy kimono – or two – or five!

Made from Art Gallery Rayon, this is my shortened Sew Caroline Florence Kimono trimmed with velvet bands.

An Adaptable Shape for Everyone

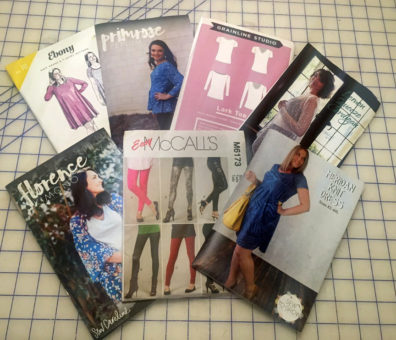
If a Kimono has always seemed like just too much fabric for your comfort level, consider fit and length. To avoid the boxy sharp rectangles, look for a kimono designed with a slight curve under the arm. My favorite is the Florence Kimono from independent pattern company, Sew Caroline. Florence has a gently shaped underarm curve that makes all the difference in its flow and fit. It removes the boxiness while maintaining the traditional shape and creates a kimono that is wearable for most of us.

When choosing your kimono pattern size, consider how much ease you are comfortable with in a “jacket” or “cardigan”. If you don’t care for lots of drapey fabric on your body style, you may want to make a smaller size than normal. If you’d like more drape, go up a size.

Think about your favorite finished length, too. Kimonos can be waist, hip, or knee length, or even longer. With your fabric choice in mind, consider the sleeve length that will be most flattering for you. For a super-quick Spring or Summer sew, leave the sleeves off so your kimono can easily be thrown on over a t-shirt or swimsuit.

My “Pumpkin Spice” Kimono. Stitched from Indygo Junction’s Contemporary Kimono pattern using a Yukata cotton panel and Japanese cotton purchased at the Sewing & Stitchery Expo.

A Buffet of Fabric and Embellishment Choices           

The rectangular pieces used to create the traditional t-shaped Kimono were originally designed for 14” – 16” Yukata fabrics. Light to medium weight fabrics like silk, rayon, chambray, linen, cotton, tencel, velvet, lace, knits and sweatering are all fabulous choices for today’s kimonos.  The simple shape is also perfect for maintaining the integrity of a large print or other fabric you “can’t stand to cut into”. The large pieces that make up a kimono will compliment your fabric’s design and show off the print, stripe, or weave beautifully!

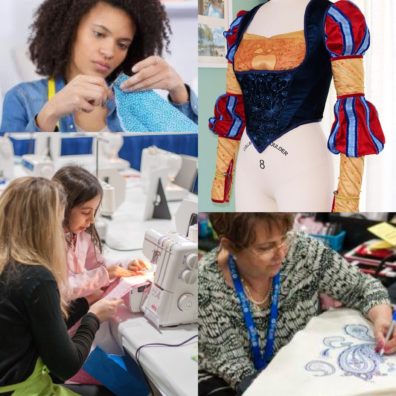
Kimonos are and amazing canvas for embroidery, applique, beading and all forms of embellishment. Use your creative skills to add interest to the back, front, or both. Embellish the front and sleeve bands with applique or pieced fabrics. Add lace or machine embroidery to the shoulders for a surprising pop of gorgeousness. And, don’t forget the edges – they’re perfect for fringe. Whatever you choose, you’ll make a unique statement of your own talent and fashion style!

I modified Simplicity 8172 to maintain the color and design integrity of this coarsely-woven, fringed Sarong length purchased for me in Indonesia by my husband

Unlimited Wearable Options

Don’t feel limited by the traditional styling of your kimono. There are SO many options! Think of it as you would any other jacket or cardigan when you’re putting together different looks. Try these styles with your Kimono:

  • Top a Summer tank and skirt or shorts with a kimono and add your favorite sandals.
  • Carry your kimono to the beach for a swimsuit cover-up with instant style.
  • Go Boho with a long kimono worn over wide leg jeans, a t-shirt and a floppy hat.
  • Add a kimono to your Summer dress or Winter LBD and create an ensemble.
  • Change your kimono’s silhouette by adding a belt or tying the fronts in waist high knot.
  • Dress up your kimono with stunning jewelry and add a cross-body bag for shopping trips.
Another Sew Caroline Florence Kimono, stitched and pieced with Japanese Indigo fabrics and Chambray. The Japanese fabrics were purchased at the Sewing & Stitchery Expo.

Watch for Creative Inspiration

Although it’s often thought that we can’t save money sewing our own clothing, the kimonos shown on the Johnny Was web site will make you think differently. Ranging in price from $300 to $800, these simply shaped jackets are stitched from luxury fabrics and embellished with embroidery and applique. All things that are readily available to those of us who enjoy sewing our own handmade wardrobes and at a much lower price! While attending the Sewing & Stitchery Expo this year, plan time for a trip to Bellevue, WA to visit their store and collect loads of inspiration to recreate on your own!

I’ve been blogging about my journey into kimono obsession on my own blog, The Sewful Life. For more details about the kimonos I’ve made, hop over there and search for “Kimono” on the right hand side. You’ll find five blog posts about the kimonos I have known, sewn, and thoroughly love!

About the Author: Annette Millard recently started her own blog, The Sewful Life, which utilizes her sewing and teaching experience to provide helpful tips and tricks, tutorials, and project ideas. Visit the blog at sewfullife.com  and be sure to say “hi” at Expo in one of her classes! View the class catalog to learn about the classes Annette will be teaching in 2019. 

Sewing for People with Sensitivities

I started sewing when I was five, learning to make everything I wanted the way I wanted it. From doll clothes to Halloween costumes, to prom dresses, even my own wardrobe in high school and college that fit me perfectly. But it wasn’t until I had a child with sensory processing disorder and Asperger Syndrome that sewing became more than just a part of my everyday life. It became a gift I could give my son.

If you know children (or adults) who have sensitivities or special needs of any kind, you will undoubtedly nod in acknowledgement when anyone speaks of cutting tags out of shirts and pants, wearing socks inside out so the seams don’t touch the toes, and an outright refusal to wear jeans.

For my son Peter, the difference between a good day and a call-mom-at-work-to-pick-up-the-child day was almost exclusively down to the clothes he wore. After my otherwise mild-mannered child had a giant temper tantrum over an orange shirt, I realized I needed to pull out my sewing machine to help him. It wasn’t the color of the shirt that was the problem. The problem was that the thickness of the fabric caused the overlocked interior seams to be very bulky, therefore not smooth on the inside. The seam itself caused him such distraction, he had no attention left over to tolerate any other irregularities or external input, hence the overwhelm and subsequent meltdown. I was only able to discover the underlying issue because he was a highly verbal child at three years old. Imagine how much more difficult it is to interpret the cause of sensory overwhelm in a nonverbal baby or child (or nonverbal adult, for that matter).

The solution, as is often the case, was far simpler than the problem. I just needed to make him the smoothest possible seams in every piece of clothing he wore. Eighteen years ago, we couldn’t find tagless t-shirts or raw-edged sweats at the store, so I learned to make the most comfortable little boy clothes I could imagine. These turned out to be the “secret pajamas” on which I would later base my entire sewing philosophy. I only bought fabrics that would wash well and not pill in the dryer because those little balls of polyester fleece were irritating to my boy’s little legs.

I started to sew his shirts inside out, tacking down the seam allowances with an additional line of stitching. I sewed strips of thin polar fleece inside jeans to flatten and soften the seams. I even stitched the pockets to the front of his trousers with soft twill tape so they wouldn’t flop around or bunch up at the side seam.

T-shirt from Sewing for Boys by Karen LePage and Shelly Figueroa, Wiley, 2011

I learned to remove tags from those t-shirts he really wanted from the store and sew an extra binding on the inside back neck if I couldn’t completely remove the tags and paper or rough ribbon remained.

Between the extra special clothing and occupational therapy, my son transcended his sensory issues and thrived in school and beyond. He’s now a completely independent successful adult, going to college, working full-time, and living in his own apartment without giving a second thought to his clothing.

When we make clothes for ourselves and others, paying special attention to their specific needs and considering comfort as much as style we truly give a gift that can affect their experience. Over the years, I’ve been able to help children who would otherwise collapse with sensory overwhelm live normal kid lives.

About the Author: Karen LePage has written books about sewing for children and adults. She is the indie designer’s patternmaking secret weapon, and has taught video and in-person classes to anyone who would listen since 2008. She believes that sewing clothes is a radical act of self-love. For more information and a demonstration of specific techniques, please join Karen in class 1926 Sewing for People with Sensitivities. Sign up at sewexpo.com when the ticket office opens. Also be sure to visit her blog One Girl Circus to learn more about Karen’s experiences and how you can adopt similar philosophies when sewing for others.

The Future Is Now: Zero Waste for Home Sewing


All sewists have various idiosyncratic ways of buying, using, and storing fabric. Personally, this practice crystallizes around an anxiety of discarding all fabric waste. No matter how small the remnant, swatch, or bit of fiber, I’m sure that one day a masterpiece will be formed with the aggregate of my horde of fabric scraps. From large black trash bags to big plastic bins, stuffed in a corner or pinned on the wall, I have scraps everywhere! When does the insanity end? If you find yourself in a similar situation, there are two choices: Start creating with the scraps amassed or create without producing any scraps in the first place. Either way you tackle it, the process is part of a global movement called Zero Waste. This movement centers around the idea of  the reduction of waste sent to the landfill through an improved design on our use/reuse of resources in daily life. As sewists, this means re-evaluating methods, techniques, and overall design of projects to produce the least amount of waste possible, if any at all.

During the ‘80’s and ‘90’s garment manufacturing became very inexpensive as production was primarily outsourced to China and other regions where labor costs and environmental oversight were and still are limited. Today, I find the recent resurgence in garment sewing is fueled not out of economic necessity but because we enjoy it! We don’t want to look like a cookie cutter, we want clothes that fit and that express a unique facet of our personalities. With this resurgence of home sewing, Zero Waste is quietly making a name for itself by answering so many of our contemporary garment sewing needs. Following the Zero Waste philosophy, sewists are discovering new ways of cutting garments that produce little to no scraps, new projects for using scraps, new techniques for fitting, and an overall wonderful creative outlet.

Much has been written about of Zero Waste fashion design. So much so, that a quick internet search (especially on Pinterest) will result in many resources. If you are returning to sewing after a pre-internet hiatus you will find the pattern industry has changed drastically to include scores of independent patterns lines, .pdf downloads, shop copies, blogs, and Instagram pages. With this explosion, Zero Waste has found an emerging spotlight in the industry. A few pioneering names to know include Holly McQuillan, Julian Roberts, and Timo Rissanen. Projects like FashionRevolution.com and MakeSmthng.org are also inspiring a new generation to become more conscious of how and what we consume by supporting a movement in making, repairing, and reducing.

Above: Example of the Zero Waste French Fold Shrug (pattern available from Diane Ericson) cut out before being sewn.

Below are some tips for those interested in exploring this approach further:

  • You can throw out almost all you think you know about conventional fitting techniques. Darts, folds, tucks, and pleats have no standard placement.
  • Decide if you want a clean and minimal finished product or handmade and artsy.
  • When fabric shopping, always look for reversible/double faced fabrics, trust me. There is no right and wrong side, both sides will most likely be visible.
  • You will work with a maximum of 1, 2, or 3 pattern pieces when following a Zero Waste-inspired pattern.
  • Develop a toolbox of finishing techniques for cleaning up raw edges such as slashes.
  • Hand finishing is fun!
  • Helpful materials include fold over binders, tapes, ribbons, and a selection various hand sewing threads like sashiko, silk button hole twist, and #50 silk tailoring thread.
  • Visible mending – Perfection is out and individuality is in! Take advantage of “blemishes” by adding a bit of originality to your pieces. A simple internet search can help inspire different ways for mending your garments.

About the Author: Ina Celaya is a designer and owner of L’Etoffe Fabrics and the Center For Pattern Design. She studied at the Fashion Institute of Technology and Los Angeles Trade Tech. Visit Ina at Expo at the L’Etoffe Fabrics booth in the Pavilion. Visit sewexpo.com for booth assignments.


Common Sense Fitting

If you don’t sew for yourself because nothing ever fits, you’re missing out on the joys of a handmade wardrobe! It doesn’t have to be hard and a few quick tips will make a world of difference. Grab a tape measure and your common sense. You can do this!

Give Yourself the Keys

A few basic measurements are the beginning to a better fit. While this may not take you to couture level, you can quickly adjust any pattern to fit your body. Remember, there’s nothing wrong with you, it’s the patterns! They don’t fit any of us and they’re not sized like the ready to wear items you buy in the store. Remember, we’re not talking about a precise fit here, but you can make it better! To begin, start with these four key measurements: full bust, high bust, waist, full hip, and arm circumference. Write them down and make sure you find a safe place to keep them. Be honest! This is just for you and no one else will know. Others just get to enjoy the beautiful clothes you’ll be making!


You’re in Charge

There are so many beautiful designs available in today’s patterns! But often we think we can’t wear a particular pattern because it looks too tight, too loose, or we don’t like the sleeves or another element of the design. Remember: You’re in charge of that pattern and how it’s going to look when you’re done. Be fearless! Using your measurements, you can change the cut of a sleeve, the fit of the body, or the way the neckline sits. The most important thing about a design is that you love the garment after it’s sewn. Spend a little time and do what it takes to enjoy sewing for yourself. That’s the real common sense secret to creating a handmade wardrobe you love and can wear proudly!

About the Author: Annette Millard loves to encourage others to make sewing easy, stress-free and fabulous! She has sewn her own clothing, taught sewing, and worked in the sewing industry for most of her life and loves what she does. Her blog, The Sewfull Life, provides helpful tips, tutorials, and project reviews. Visit Annette on her blog at www.sewfullife.com and be sure to say hello at the Sewing & Stitchery Expo in one of her three classes!

7 Easy Tips For a Better Fit

Tip #1: Don’t go by another sewist’s experience fitting a pattern! Because we are all wonderfully unique, it’s doubtful that you are the same exact size and like the same exact fit!

Tip #2: Use your pattern to find the body measurements and finished measurements before you cut! Consider how much extra room (ease) you like in your garments and keep that in mind when you choose your size(s).

Tip #3: You don’t have to use just one size of the pattern! Find the right size for your measurements and go with that. I often use two to three sizes when I’m sewing.

Tip #4: Assemble your tools and don’t be afraid of the pattern. You’ll need a dressmaker’s curve, a sturdy tape measure, a straight ruler, and a variety of marking tools.

Tip #5: Banish too tight sleeves! Compare your arm circumference to the pattern sleeve and make the proper adjustments if needed. You’ll want more ease for a woven fabric than a knit, so keep that in mind.

Tip #6: Don’t just hope it’s the right length! Measure, measure, measure. Before you do any cutting, determine the length you want, compare it to the pattern, and make your adjustments.

Tip #7: Sign up for my Common Sense Fitting class at the 2019 Sewing & Stitchery Expo. You’ll learn more valuable tips and take home a measurement chart and handout and see how easy it is to make adjustments to your patterns. I can hardly wait to hear about your success! Visit www.sewexpo.com to learn more about purchasing class tickets.

Why We Cosplay: Creating Community

Cosplaying is always better when you have someone to share it with and this community is fantastic for that kind of camaraderie! I have been making costumes for nearly eight years and every time there is a convention coming up, I always seek out like-minded people to share my joy with. At last year’s Pax (Penny Arcade Expo), one of the largest video game consumer conventions in the nation, I reached out to a group of friends with whom I share the love of the video game Final Fantasy. I asked them to join me in making something from the franchise. Our theme? Classic Characters. We dug deep into the game’s original graphics and came up with simple yet iconic costumes for the White Mage, Black Mage, Red Mage, and the ever present Chocobo.

Instead of using conventional cut and sew methods for my White Mage, I decided to knit it with a knitting machine. The finished product was a fully fashioned sweater robe with a peplum of the iconic red triangles.

For my husband’s black mage, I used a gorgeous soft ultra-suede to make his robe and thick premium felt for his mage hat and gloves. For the veil, I used a black mesh which allows him to see through but still have an opaque texture from the outside. The group comprised of Sammy N. as the adorable Yellow Chocobo, Kelly M. as the Powerful Black Mage, Me as the White Mage, and Megan D. as the Red Mage. We formed an amazing party indeed!

In other instances, the community comes together to offer advice and help on costumes. While traveling in Japan last year, I couldn’t help but stop by a fabric store in Osaka. While there, one fabric really grabbed my attention. It is an Alice in Wonderland type fabric, with tea parties, pocket watches and rabbits. As I am relatively new to Lolita costumes (a style characterized by a Victorian-esque voluminous skirt), I asked the community to help decide on the styling and involved them in every subsequent step of the way.

I started the conversation by posting about my fabric and my general idea of making a Lolita dress. From there, the ideas started to pour in! Suggestions were to make a dress, a parasol, etc. Ultimately, I only had six yards of this fabric, so I had to plan accordingly. Once I reached the decision to create a dress, I set out to research different styles and showed the community my favorites. From those inspirations, I designed a whole bunch of dresses. Not wanting to overwhelm and to get a clear direction, I presented two of my favorites for the community to pick from.

While it was clear that the community favored B, there were also additional suggestions including adding a pocket to the dress. With that in mind, I designed another more complete and detailed version.

I continued to post on my social media pages for more sewing and construction videos, tutorials, and feedback and then of course, to share the final finished dress. To thank and give back to the community, I created a video demonstrating my method of draping this piece. Please check out my video below, enjoy!

Video Transcript

About the Author: Anna He is a costume designer and cosplay artist based out of Seattle. She has designed patterns for McCall and has worked for brands including Norma Kamali, Eileen Fisher, and Nordstrom. Get to know more about Anna and her work seattlecosplay.com and be sure you’re on the mailing list to receive the 2019 Sewing & Stitchery Expo class catalog to learn about Anna’s 2019 class offerings before tickets go on sale in January.

Sew Expo Insider

Are you ready for the best sewing party around?  I am looking forward to my trip to Puyallup for the Sewing & Stitchery Expo, and I hope to see you there!  This show is great with so much excitement, inspiration, energy and friendship.  I love the location at the Washington State Fairgrounds with Mt. Rainier always looking over us, even when not visible.  Expo is unique and special in so many ways.  I want you to get the most out of these four days, so here are a few tips:

Coordinate visits with friends in advance.  One of the best things about the Sewing & Stitchery Expo is sewing friends gathering from across North America.  Even if you are attending alone, no worries!  You are surrounded by sewing friends in waiting.  For many, this is the annual chance to meet up.  Have your friends’ cell numbers programmed into your fully charged phone.  When muting your phone during classes, remember to use the vibrate mode so you can receive text messages. Remember that the days can be long and you may be using your phone more than normal so you may want to bring a portable charger with you.

Check the schedules in the Showplex for classes, free stage events, drawings and more.

Enjoy the variety of foods at Sew Expo.  The food selection is just as extraordinary as the class schedule.  No show has more delicious food.  The variety and quality is A.M.A.Z.I.N.G.  I’m talking about the famous Fisher’s Scone or one of those fantastic French Crepes!!  Take advantage of the location, the food, and (hopefully) the weather.  Arrange to meet friends outside, eat at the picnic tables or take a simple break between classes.

Keep track of your possessions.  But, if you misplace a tote or phone, check the Visitors Information booths in the rear of the Showplex and Pavilion.  Each year lost and found items are turned in to these two locations.

Take advantage of the wonderful entertainment offered Friday and Saturday nights. These special events are perfect to enjoy with friends old and new. Share laughs, create memories, and learn while you’re at it! This year Joe Vecchiarelli heads up Friday Night Live full of comedic anecdotes and fashion straight from your favorite shows like Dancing with the Stars. Not to mention he’s bringing a special guest, winner of season 16 of Project Runway, Kentaro! The Stitchin’ Post’s Valori Wells will grace the stage Saturday for the annual Quilter’s Night Out with more than 60 of her favorite quilts from over the years and share with you some  stories from her vast experience in Textiles.

Attend style shows upstairs in the Pavilion and the Free Stage presentations in the Showplex.  With a little planning, these locations provide a nice opportunity to hook up with friends, sit for a bit and take a break from the action.  The bonus is — you might learn something new.

Take pictures.  Take lots of pics and post them on our Facebook page.  We know friends near and far that due to health or other commitments cannot attend, but they are watching on social media.  You don’t have to be a Kardashian to take lots of pics!  Bring your smiles and selfie sticks and take advantage of the fun Expo photo backdrop on the red carpet to the evening events!  Be sure to tag @sewexpo and use hashtags to share your photos with everyone: #sewexpo2018 #sewingandstitcheryexpo #sewandstitchpuyallup

Try something new! Expo is all about fine tuning our skills and expanding horizons! Maybe it’s time to test your garment sewing skills in a new realm such as cosplay! Or, after years of stitching quilts you want to pick up a pair of needles to being knitting…who knows? What’s for sure is that Expo is the place to test the water!

My last, and most important, tip…  WEAR COMFORTABLE SHOES.   My shoes are to my happy day what my sewing machine needle is to my happy sewing.  No matter how wonderful your sewing machine is, if your needle is not right, it WILL NOT SEW properly.  Same thing with my shoes.  It doesn’t matter how much time or money I put into my Sew Expo experience — if my shoes aren’t right — my day will be uncomfortable.

This is not the time or place to wear new cute shoes.  I’ll be wearing boots and shoes …which, sadly, have seen better days.  But I can walk with a kick in my step around the fairgrounds regardless of the weather.  Rain or shine, and be prepared for snow too, I know comfortable shoes are a giant step to enjoying the best Sew Expo ever! Meet me there…

About the author: Rhonda Pierce is spokesperson for SCHMETZneedles.com.  She is giving the popular SCHMETZ classes each day at 9:30AM.  Rhonda also serves as a contributor to the Expo’s FB page during the show so you may see her around taking lots of photos to share.  She loves to see the outfits and projects you made.   Be sure to say hello, and have your pic taken by Rhonda!

Embroider a Fashionable You

Embroidery is everywhere! Jeans, blouses, bags, even shoes – embroidered embellishment is blooming on all elements of apparel and accessories. Traditionally, embroidery was limited to expensive items created expressly for special occasions.  Luckily, the introduction of home embroidery machines make it possible for home sewists to make their own beautiful creations suitable for any lifestyle. Creating fashion embroidery is a wonderful way to enjoy your embroidery machine.  Success at embroidering fashion lies in understanding design flow, contrast and color, and optimum stabilization.

True fashion embroidery is more than simply placing a design onto a garment or accessory.  Consideration should be given to the scale of the design in relation to the wearer and area to be embroidered. Ideally, the embroidery should have a natural look, as though it was grown on or woven into the garment, rather than simply placed at random.  Use printed templates or embroidery software to audition your designs and create a pleasing effect.

Color and contrast are equally important elements as design placement. Although subtle differences between thread colors are beautiful, they may not allow individual elements to show in the overall design.  Often a slightly bolder color choice with a bit more contrast will provide a more pleasing effect.  Similarly, the color of the fabric background, as well as its relative lightness or darkness, needs to be considered. Dark colors do not show well on a dark background, nor light colors on a light background. Be careful to use enough contrast to ensure your designs will show.

Finally, proper stabilization is needed to support your embroidery and keep it looking its best. Using too little stabilizer can result in puckering and other fabric distortion, as well as cause design outlines to stitch incorrectly.  Yet stabilizer should not interfere with the wearability of your garments.  Using two layers of lightweight cutaway stabilizer, for instance, gives excellent support and is softer and easier to trim attractively than one heavy layer.  Be sure to match the amount of stabilizer support with the density of the designs you are stitching.

Embroidery is not only fashionable, it is a wonderfully creative way to have sewing fun! There is an amazing wealth of designs available and an unlimited array of threads to choose from. With a little attention to preparation you can successfully stitch your own fabulous creations.  

–Katrina Walker –

katrinawalker.com

About the author: Katrina Walker is a regular contributor to Creative Machine Embroidery and hosts two online embroidery classes for BurdaStyle Academy – Fashion Embroidery with Katrina Walker, and Embroidery Essentials: Fabric Focus. Join Katrina at Expo! Register for her classes now! 

Hack the System: Seeing Possibilities Instead of Patterns with Simplicity

We’ve all heard the term “hack” applied to pretty much everything at this point: life hack, cooking hack, storage hack, every kind of hack you can imagine, but what does it mean?  “Hack” these days is usually short for “a new and more efficient way of addressing a problem, or an alternative way to use a product other than as intended.” So what does it mean when you apply the word “hack” to a garment or sewing pattern? You could take it in a literal sense: “hack” a pair of pants by turning them into shorts, “hack” a t-shirt by fringing it or cutting the neckline into a new shape, but it’s when you really look at that second definition of hack that the possibilities for patterns really start to come into focus.

Most sewing patterns are a collection of silhouettes that share a common theme. Maybe they all have the same body with different sleeves, or several different lengths, or they’re a combination of multiple fabrics, or all of the above. In fact, I bet you’ve thought more than once before, “hmm, I wonder if I could put those sleeves on the other bodice instead” or “I would really love this dress if it were in two different colors, and maybe a little shorter.” Well, if you’ve had those thoughts and followed through—congratulations! You’ve already hacked a pattern!

It can be a little tough sometimes to look at a pattern and see something other than what is right there in the picture on the envelope, but patterns can be even more rewarding if you look beyond the view letters. After all, patterns can cover a wide range of styles, but we’re all complicated individuals: sometimes you want to mix it up, and there’s no reason you shouldn’t! Simplicity wants to encourage sewists everywhere to think outside the box—or the pattern envelope, as it were. That’s why we’ve created a brand new line of patterns to get you started down the path to a more unique wardrobe. We give you a basic wardrobe item and a few suggestions for how to hack it, and provide you with the means to do the rest on your own (including a blank sheet of pattern tissue with a printed grid, so you can draft your own additions). Changing lengths, adding and subtracting sleeves, using elastic or trim to change a look—the only limits are your imagination.

Getting started with putting your own spin on things can be super easy. Here are a few simple suggestions to get you hacking!

  • Swatch it up. If you like the look of a pattern but you still think there’s a certain something missing, why not try color blocking? You’ll have to figure out your own yardage, but a little contrast can make a simple top feel like something utterly special.
  • Mix and match. If you really want those sleeves with that bodice, why not give it a shot? As long as the armscye (the opening in the bodice for your arm) is the same shape on both bodices, you can swap the sleeves out with no problems! (Hint: if views A and B share the same back but have different fronts, that’s a pretty good clue that you can pop Sleeve A on Bodice B with no worries!)
  • Take a shortcut. Feel like showing off your legs, or have arms that just need to be free? Don’t let us tell you how long your garment needs to be. We give you the length of the finished garment on the back of your pattern envelope, but that’s just a place to start!
  • Pockets? Pockets. Every pattern should have pockets, in this sewist’s opinion. But just in case yours doesn’t—or doesn’t have the type of pocket you like—why not draft one of your own, or borrow one from another pattern? Patch pockets are easy as pie and twice as cute!

Good luck, and happy hacking!

About the author: Deborah Kreiling has been part of the Simplicity team for over 35 years. She is currently the Design Development Director at Simplicity where her daily work touches every part of the sewing pattern product – working on each design from concept to final pattern with envelope. Learn to sew with Deb on her YouTube channel and at creativebug.com.

Embellishments and Weatherizing Make a Gorgeous Costume Shine

Some of the reasons for me to cosplay are the attraction to the costume and love for the character. I love styles that are technically challenging and that push me to learn new techniques that I don’t encounter every day. In my cosplay portfolio, a majority of the projects are strong females out of video games. The concept artists may or may not be trained as a fashion designer, so it is up to me to execute all the gorgeous intricate designs and make them come to life. Besides getting the silhouette correct, embellishment and weather are a HUGE part of executing a breathtaking costume.

Embellishments are a huge part of what makes a plain cosplay amazing. Please see below for a detailed look in to the steps in which I created the embellishments for a wedding gown cosplay based on a Game of throne’s character.

Video Transcript

  • To recap the materials:
  • Stiff Bukram for body + support
  • Lace trims – Flat black Mesh, braided trims, flat trims, ropes.
  • Beads – red glass beads, gold spacer beads, garnet beads, crystals for extra bling
  • French wires Misc embroidery floss.

Depending on what your choices are, your cosplay may not be as highly decorated as this, but regardless of what your cosplay looks like, this next part will apply to your costume.

Weathering is a process of adding age and battle proven damage to your costume. Fresh off the sewing machine, everything is new and shiny. However, it is not how the character looks. They had been in battles and they traveled far to come to the world they now reside. To show and capture your character’s history, we will go through a few simple step of how to add depth to their background.

For a light to mid back ground color, we will use black paint to add depth. For a dark color fabric, we will use brown, or tonal darker color to add depth. For our demo, we will weather this leather bag.

After cutting out the pattern pieces, use black acrylic paint to darken the edges. Start with acrylic paint, and lightly dilute with fabric medium. The fabric medium will make the paint more flexible.


After the edges are dried, sew bag together with top stitch thread, according to your pattern. If I didn’t have topstitch thread, I would use a triple stitch to emulate hand stitching effects.

After the bag is assembled, rumble the bag together. (I know, it is painful to rumble such a pristine piece, but it will be worth it!) the line where the wrinkles formed will be our guide on where to put more weathering.


Load a brush with more acrylic/fabric medium paint and paint along the wrinkle line. After a few seconds, lightly blot away and repeat and feather the edges until the correct amount of shadow is achieved. Lastly, lightly pat away excessive paint with paper towels.

The end result is an antiqued bag! You can use this technique for other textiles as well. Just add fabric medium to make sure the acrylic paint sticks to fabrics.

Thank you so much for reading and I look forward to seeing you at Expo! Sign up for my classes on Saturday (#2806 Easy Grading Costuming Patterns to Best Fit Your Body & #3825 Advanced Grading Costuming Patterns for Perfect Fit)!

About the Author: Anna He is a costume designer and cosplay artist based out of Seattle. She has designed patterns for McCall and has worked for brands including Norma Kamali, Eileen Fisher, and Nordstrom. Get to know more about Anna and her work at Expo in her two class offerings or at seattlecosplay.com.

Sewing With Knits – Basics For Success


Knits! T-shirts, leggings, or a soft knit dress are always a great choice for comfort in ready to wear. If you haven’t sewn your own though, you can! Knit fabrics have been my favorite choice for years and my sewing “toolbox” is full of awesome tips. I’ve outlined the basics for you below – for even more tips, techniques and confidence, sign up for my 2018 Sewing & Stitchery Expo class!

Needles, Thread and Other Knit Sewing Friends

For knit fabric sewing, always choose a stretch needle in the size appropriate for your fabric weight.  On your sewing machine, thread up with Coats’ new Eloflex Stretch Thread for seams, hems and topstitching that retain their stretch. Your serger will be fine with a regular cone thread. Basic sewing supplies should include ballpoint pins, serrated scissors and/or a rotary cutter.

Gorgeous Knits from Pacific Fabrics

Today’s Knit Fabric Stars

When choosing a knit fabric, be sure to check the percentage of stretch and which direction it goes. Neglecting this step could result in a wardrobe sewing disaster and you definitely want to avoid that! Pre-wash as you would any fabric designed for clothing.

Jersey, Ponte, Scuba and Double Brushed Poly are the stars of today’s knit fabric world. There are many other choices, but these are the fabrics we’re all crushing on right now.

  • Jersey: A light-weight, single knit fabric most commonly used for t-shirts and dresses.
  • Ponte: A firm, medium-weight, double knit perfect for pants, jackets, skirts and structured dresses.
  • Scuba: Also a double knit, but a bit lighter weight and finer of surface than Ponte. Beautiful for skirts and dresses.
  • Double Brushed Poly: Soft, stretchy and like wearing “secret pajamas”! Perfect for leggings, dresses and tops.

Choose Wisely – Finding the Right Pattern

The Big Five pattern companies offer wonderful patterns for knits. Independent companies such as Sew to Grow, Closet Case, Grainline Studio, Sew Caroline  and Snapdragon Studios also offer lots of choices for beautiful knit patterns. Be sure to check the back of the pattern envelope for suggested fabrics.

Knit Fabric Sewing Basics

“Do I have to have a Serger?” No! Any Sewing Machine can be used to sew knits with Coats new Eloflex Stretch Thread. A Serger is a wonderful thing for sewing knit fabric seams though, so if you own one, definitely use it. If a Cover Stitch machine is available to you, they are marvelous for hemming and top-stitching.

A ¼” seam is the perfect width for knits. You may find that seam allowance trimming is needed, depending on the pattern company you choose.  The stretch and drape of a knit fabric is best enjoyed with this “narrow” seam allowance.

Knits do not ravel, so seam finishes are not required! To reduce bulk, hem edges do not need to be turned under. There are many stunning options for neck, sleeve and hem finishes to be explored. You can even use the cut edge as your “finish”!

Join Me! Sewing With Knits – Trends & Techniques for Every Body

Are you ready to sew? I’ll have loads more info in my class for you along with a super helpful handout to take home. And, you’ll get to see what I make from the beautiful fabrics provided by my sponsor, Pacific Fabrics! Sign up right here and I’ll see you in class!

About the Author: Annette Millard recently started her own blog, The Sewful Life, which utilizes her sewing and teaching experience to provide helpful tips and tricks, tutorials, and project ideas. Visit the blog at sewfullife.com  and be sure to say “hi” at Expo in one of her three classes!